TrueNAS
Prerequisite: Proxmox
Now that we have Proxmox installed and configured properly, it’s time to set up our TrueNAS VM to run our bulk storage array for our multiple HDDs.
NOTE: If you do not have any HDDs connected to your server, or you only have one HDD connected, skip this page and proceed directly to the next page (HAOS). TrueNAS is designed for creating storage pools from multiple HDDs, so this will not apply to your setup.
Prepare for Installation
Set Up VFIO for HBA/SATA Controller
NOTE: When virtualizing TrueNAS, you will want to pass through an entire HBA or SATA controller to the virtual machine, not the individual disks.
Next, we need to passthrough the HBA or SATA controller that your HDDs are connected to. To do this, we first need to find the PCI device ID of the controller.
Under “Datacenter”, click on your server node and then select “Shell” in the menu to the right.
Enter the command below to view PCI devices that contain “sata/sas/scsi/raid” in the name:
lspci -nnk | grep -A3 -i 'sata\|sas\|scsi\|raid'
Find your controller in the list and take note of its PCI ID(s), usually formatted similar to 4c:00.0, along with its vendor/device ID, usually formatted similar to 1000:0097
Next, we need to confirm that this controller is within its own IOMMU group. Do this by running the command below to output a list of devices and their associated IOMMU groups:
pvesh get /nodes/$(hostname)/hardware/pci --pci-class-blacklist ""
Find your PCI ID(s) in the list and confirm no other devices are in the same IOMMU group(s).
Once confirmed, we now need to bind the device to vfio-pci so that Proxmox will not attempt to use it for itself so it will be available to passthrough to the VM.
Do this by creating a VFIO config file using nano by running the command below:
nano /etc/modprobe.d/vfio.conf
Inside this file, add the line below, replacing the vendor/device ID 1000:0097 with the one you found for your device:
options vfio-pci ids=1000:0097
Press Ctrl + X to exit, Y to save changes, Enter to confirm and exit nano, then update your initramfs again by running this command:
update-initramfs -u -k all
Once complete, reboot Proxmox using the “Reboot” button in the top-right corner of the UI.
After rebooting, we need to verify that the controller is no longer in use by Proxmox and is available for passthrough. To do this, run the command below, replacing the ID with the PCI ID of your controller:
lspci -nnk -s 4c:00.0
Look for Kernel driver in use: vfio-pci or no “in-use driver” line.
In my case, my controller still showed Kernel driver in use: mpt3sas, meaning that the system is loading the mpt3sas driver before the vfio-pci driver, so the controller is attaching itself to the mpt3sas driver and not the vfio-pci driver like we want. Let’s go over how to fix this in case you run into something similar.
To make the system load the vfio-pci driver before the mpt3sas driver, we will create a soft dependency by running the command below to create a configuration file with nano:
nano /etc/modprobe.d/softdep.conf
Inside this file, add the line below, replacing mpt3sas with the driver in question:
softdep mpt3sas pre: vfio-pci
Press Ctrl + X to exit, Y to save changes, Enter to confirm and exit nano, then update your initramfs again by running this command:
update-initramfs -u -k all
Then reboot Proxmox again. After the reboot is complete, check again by running the command below, replacing the ID 4c:00.0 with the PCI ID of your controller:
lspci -nnk -s 4c:00.0
You should now see Kernel driver in use: vfio-pci which means our controller is now able to be passed through to a VM, so let’s proceed.
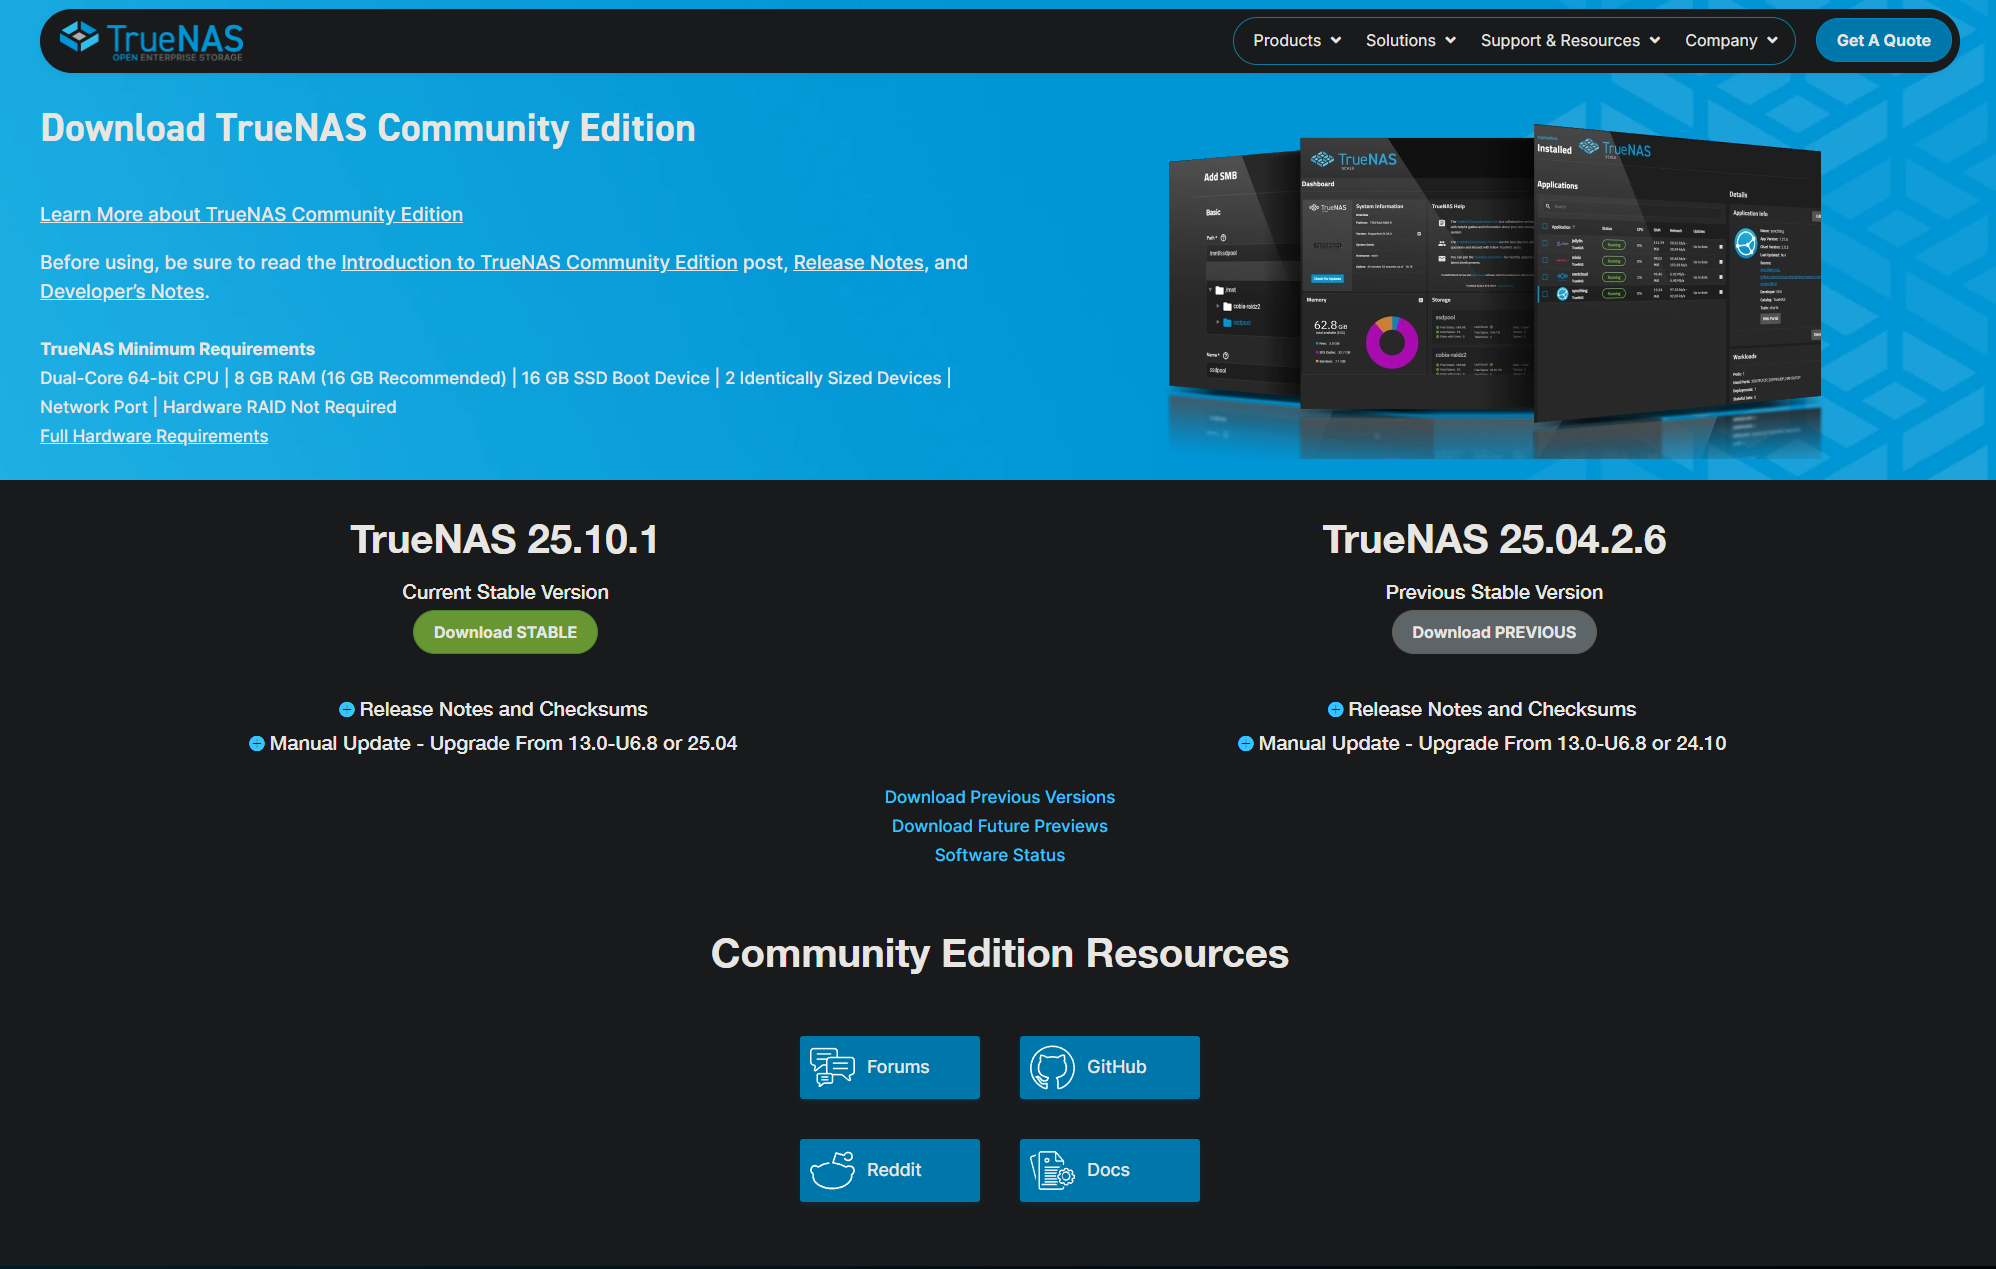
Download TrueNAS ISO Installer
Navigate here to access the TrueNAS Community Edition download page. Click the “No thank you, I have already signed up” link in the bottom-right corner, then choose the Current Stable Version of TrueNAS by clicking “Download STABLE”.
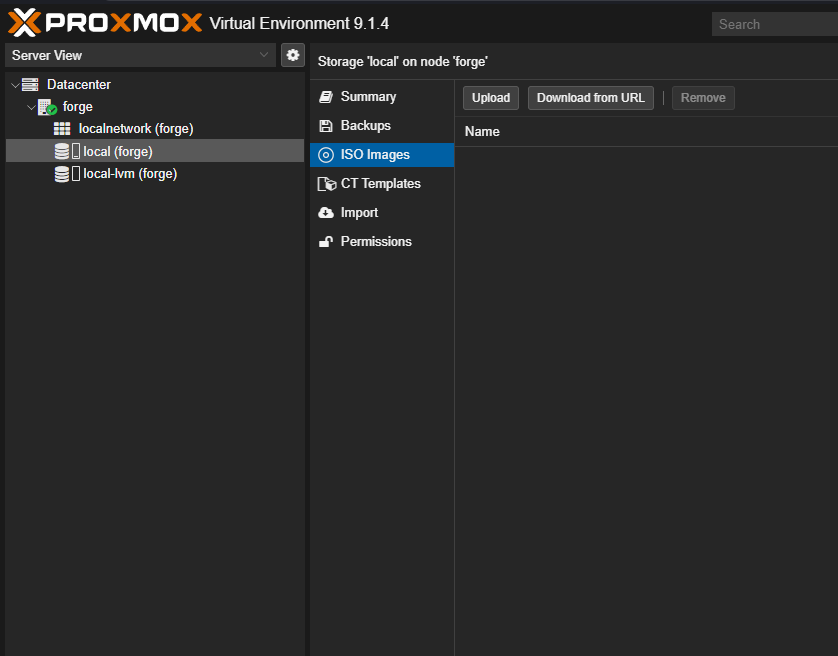
Upload the ISO to Proxmox
Back in your Proxmox web UI, under Datacenter > (your server node) > local, click on “ISO Images” in the menu to the right.
Click on the “Upload” button. In the window that appears, click “Select File” and then choose the TrueNAS ISO installer you downloaded earlier, then click “Upload”.
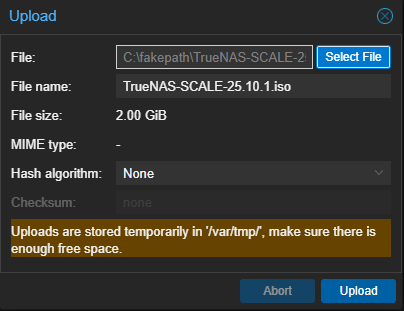
Close the window once complete.
Create the TrueNAS VM
Under “Datacenter”, select your server node, then click the blue “Create VM” button in the top right corner of the UI. This will open a window with a series of pages that we will enter our VM configuration details into.
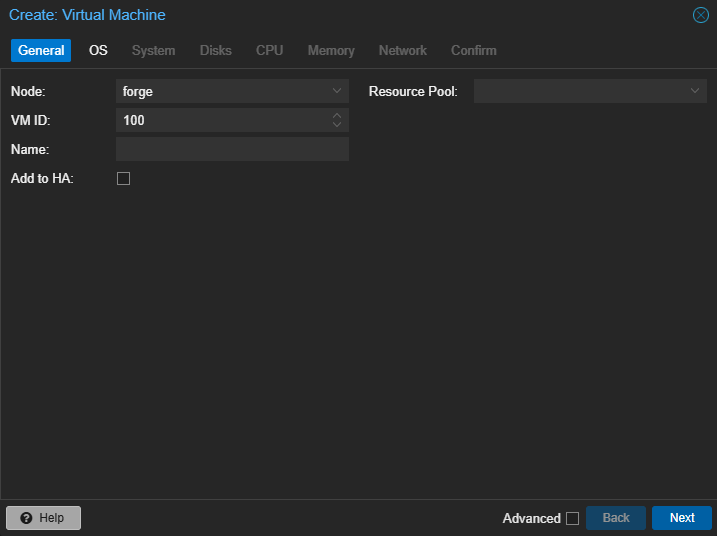
On the General page:
- Set “Name” to whatever you want to name this VM. In this example, we will use
truenas - Make sure the “Advanced” box is checked
- Enable “Start at Boot”
- Click “Next”
On the OS page:
- Set “ISO Image” to the ISO that you uploaded earlier
- Click “Next”
On the System page:
- Set “Graphic card” to
VMware compatible(I had to do this to avoid graphical issues with the TrueNAS installer) - Set “Machine” to
q35 - Set “BIOS” to
OVMF (UEFI) - Set “EFI Storage” to
local-lvm - Disable “Pre-Enroll Keys”
- Click “Next”
On the Disks page:
- Set “Disk Size (GiB)” to
32 - Click “Next”
On the CPU page:
- Set “Cores” to however many virtual CPU cores (vCPUs) you want to allocate
- I recommend at least 4 cores, but do not allocate more than the number of “threads” that your actual CPU has.
- Set “Type” to
host - Click “Next”
NOTE: You can “over-provision” vCPUs, meaning if the actual physical CPU installed in your server has 8 cores and 16 threads, you can technically assign 16 vCPUs to multiple VMs, and each of them will have “full access” to the available threads on your physical CPU, but a general rule of thumb is to start small and only allocate more if needed.
On the Memory page:
- Set “Memory (MiB)” to the amount of RAM in MiB you can allocate to this VM
1024= 1GB,2048= 2GB, etc.- I recommend at least 8GB if possible (
8192)
- Make sure the “Advanced” box is checked
- Disable “Ballooning Device”
NOTE: You cannot “over-provision” RAM like you can with vCPUs. Ensure the total amount of RAM allocated to all VMs on your server still leaves at least 2GB RAM left over for Proxmox itself to use.
On the Network page:
- Disable “Firewall”
- Click “Next”
Click “Finish”.
Passthrough HBA/SATA Controller
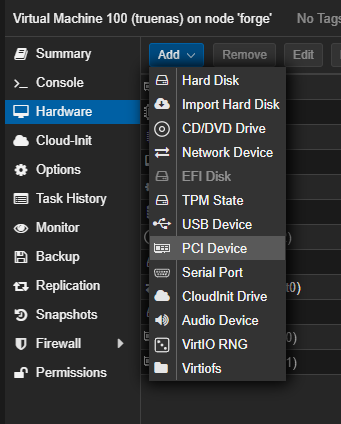
Under “Datacenter” > (your server node), select your TrueNAS VM and then click on the “Hardware” menu item.
Click “Add” > “PCI Device”.
In the window that appears:
- Select “Raw Device” instead of “Mapped Device”
- In the “Device” dropdown, select the PCI ID of the controller you want to pass through
- Make sure the “Advanced” box is checked
- Enable “All Functions”
- Enable “PCI-Express”
- Click “Add”
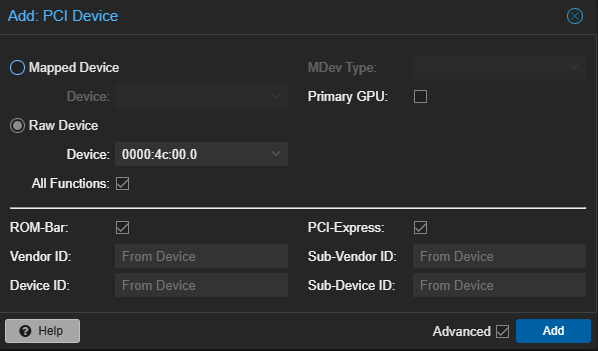
If your controller has multiple PCI IDs, follow the above steps again to add another PCI device for the additional PCI ID.
Install TrueNAS
With your controller successfully passed through to the TrueNAS VM, it’s time to start up the VM and install TrueNAS.
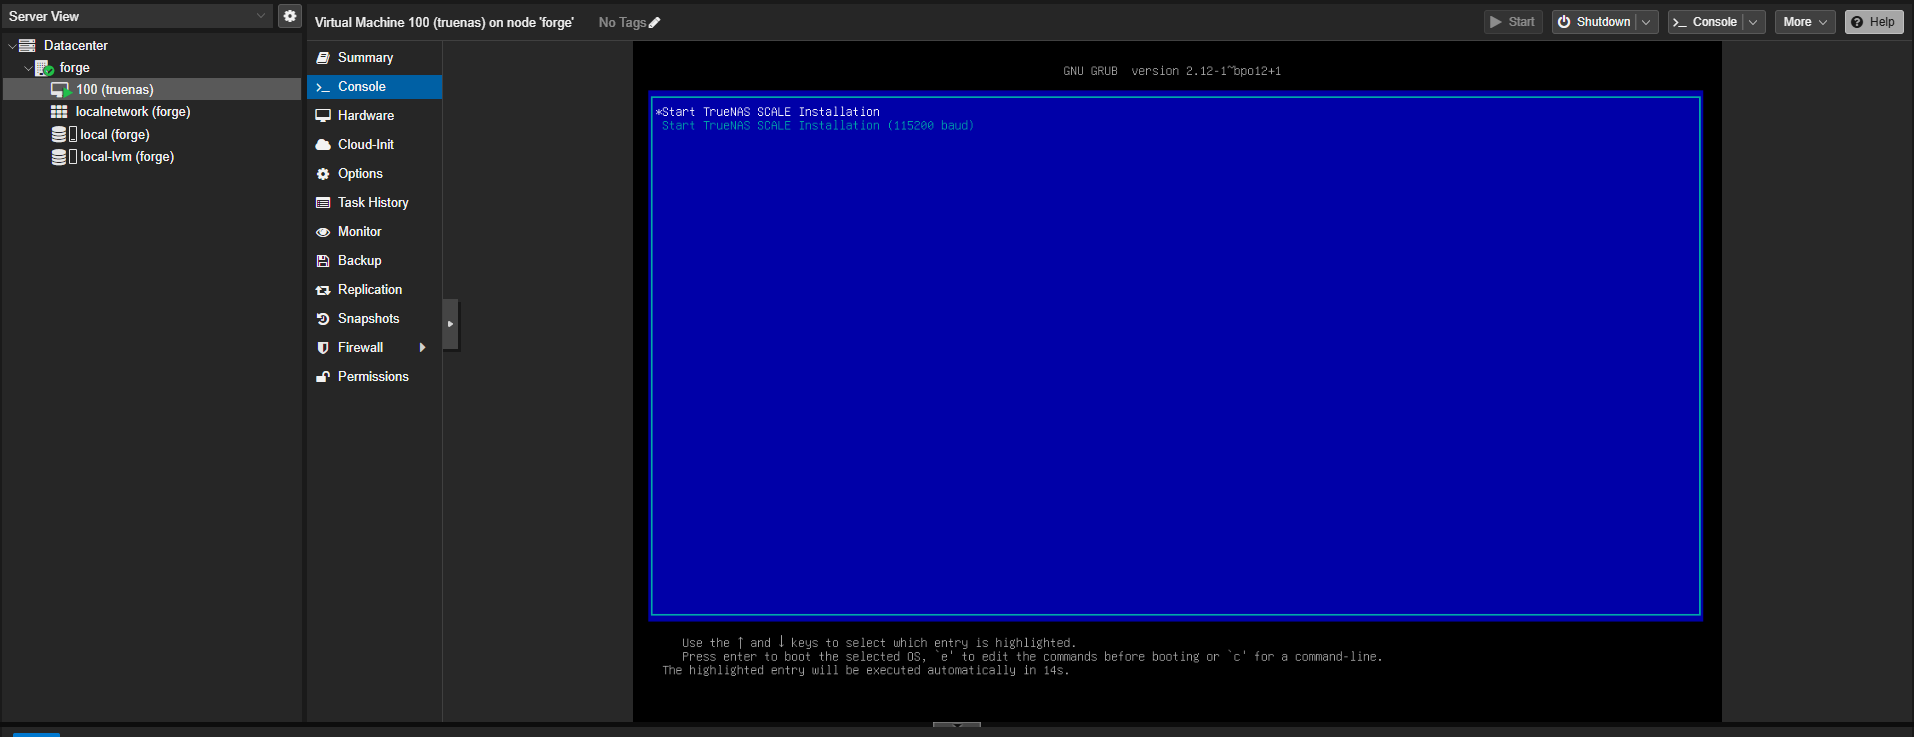
Under Datacenter > your server node, select the TrueNAS VM, click on the “Console” option in the menu to the right, then click the “Start Now” button in the center of the console window OR click the “Start” button in the top-right corner of the UI to start up the VM.
You should now see the display output of the VM in the console window. Use the keyboard to ensure Start TrueNAS SCALE Installation is selected and then press the Enter key to proceed.
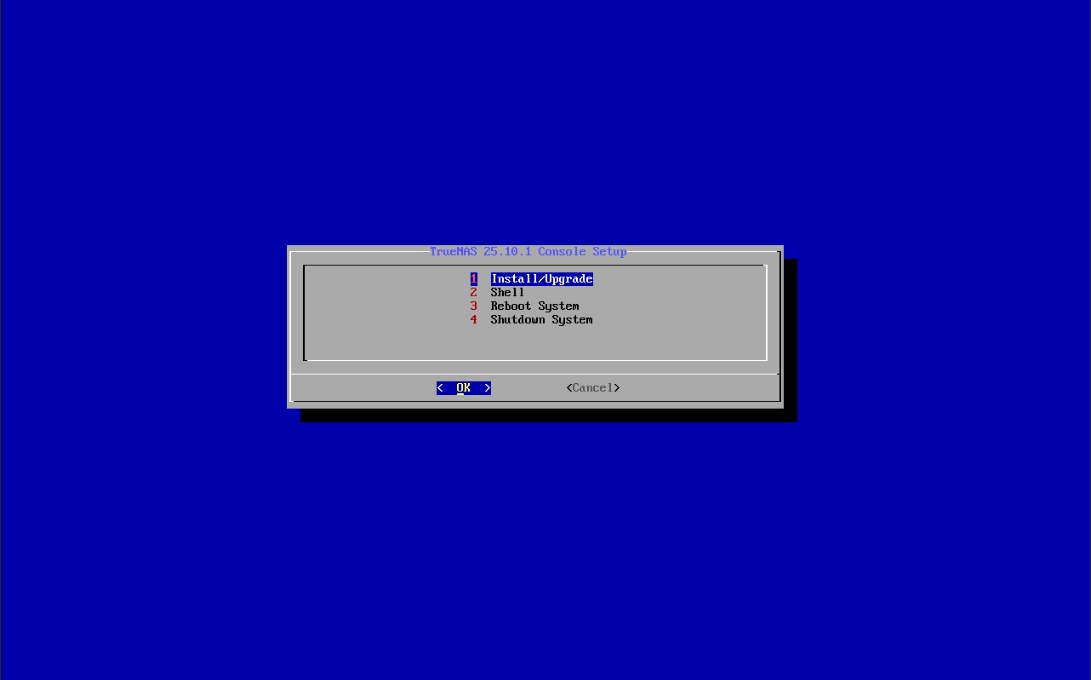
Select Install/Upgrade and press the Enter key to proceed.
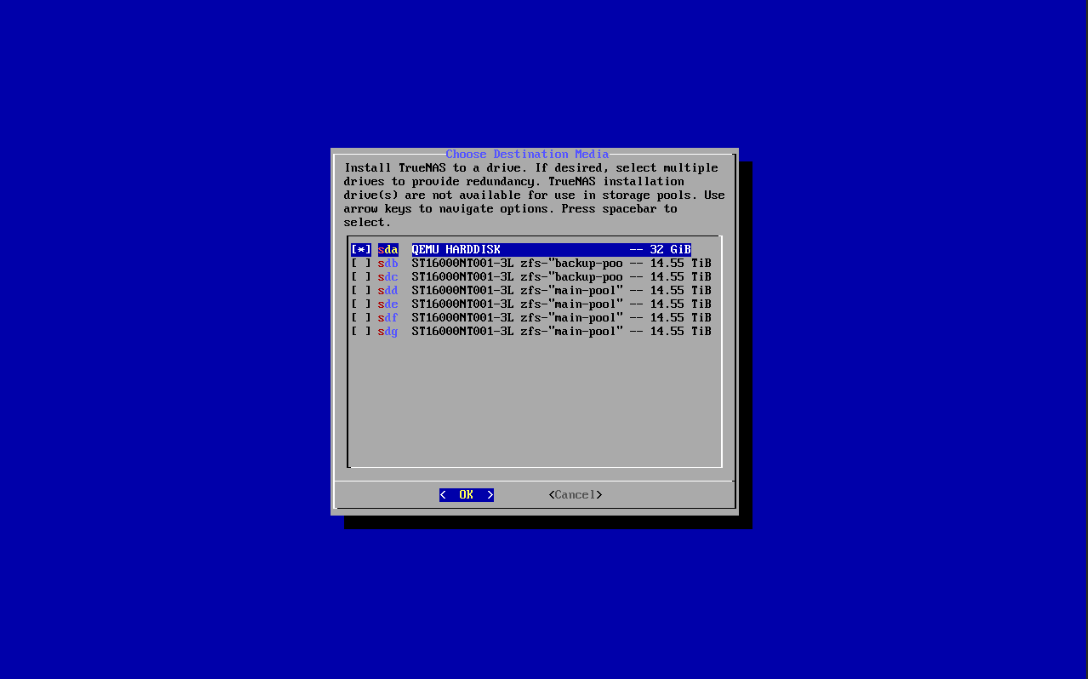
Next, we need to select the disk we want to install TrueNAS onto. Also, as a quick sanity check to confirm our controller passthrough is working, all of your hard drives should show up in the list of disks on this page, along with the 32GB virtual disk we set up when we created the VM. Use the arrow keys to highlight the 32GB virtual disk, then press Spacebar to select it, then press the Enter key.
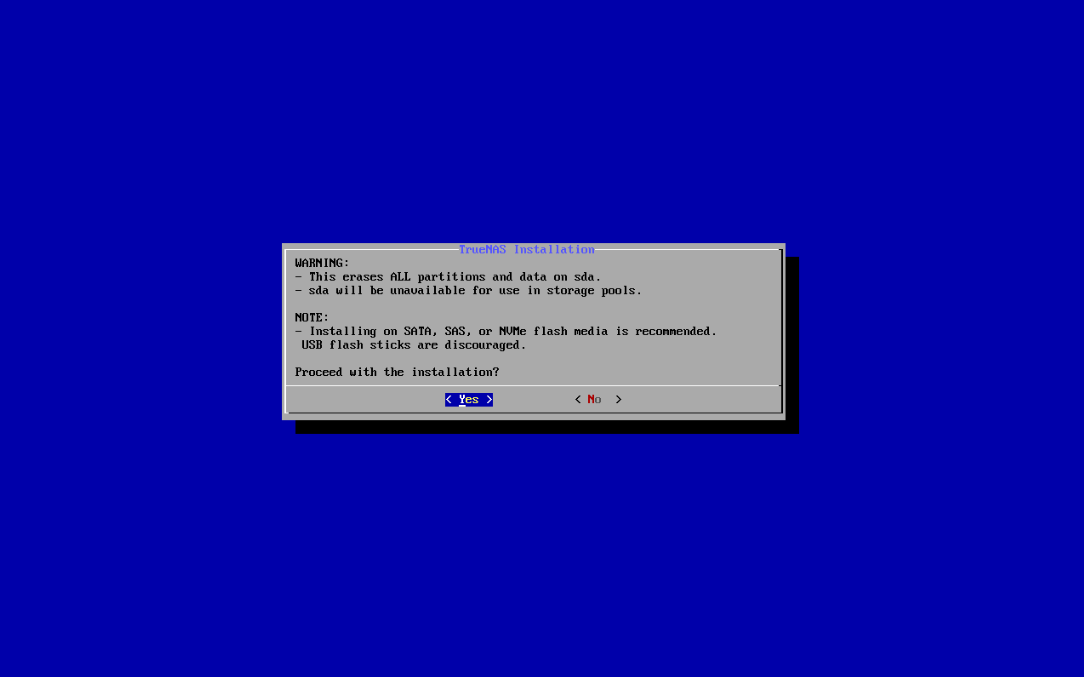
You will next see a confirmation page asking if you want to proceed. Ensure Yes is highlighted and then press the Enter key.
On the next page, choose Configure using Web UI then press the Enter key to proceed with the installation. Once complete, you will see a success message. Press the Enter key again to return to the main menu, then highlight Shutdown System and press the Enter key to shut down the VM.
With the VM now shut down, open the VM’s “Hardware” menu, select the “Display” line and click the “Edit” button.
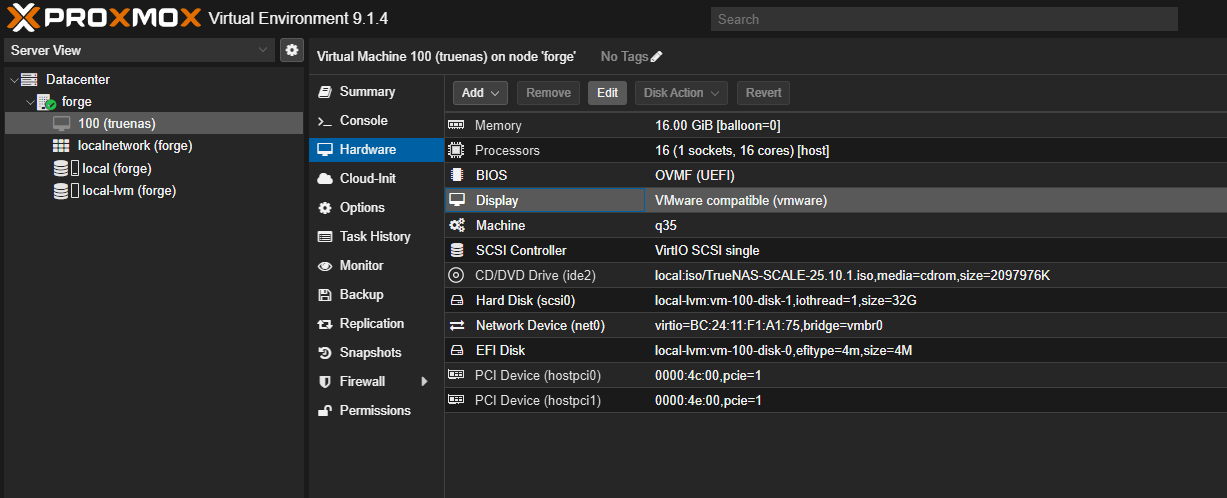
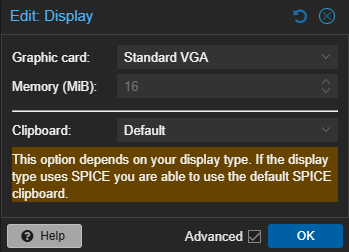
In the window that appears, change “Graphic Card” to “Standard VGA”, then click “OK” (we need to do this so that the display output works properly again now that the installation is complete).
Once changed, go back to the console window and start up the VM again. Once it has completed booting up, you should see the below in the console window:
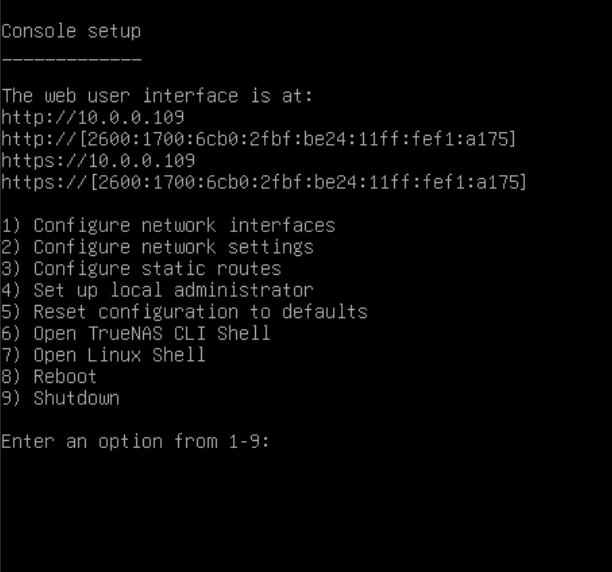
The TrueNAS VM was automatically assigned an IP address by your router/DHCP, in this example it is 10.0.0.109.
In a web browser, navigate to the IP address shown in the VM’s console window to access your TrueNAS VM so we can begin configuring TrueNAS.
TrueNAS Configuration
NOTE: If you prefer a video guide for configuring TrueNAS, Hardware Haven has a great “getting started” video below.
Everything after 26:35 does not apply since we will be using a separate VM for running our apps.
If you instead prefer more detailed written instructions, continue reading below.
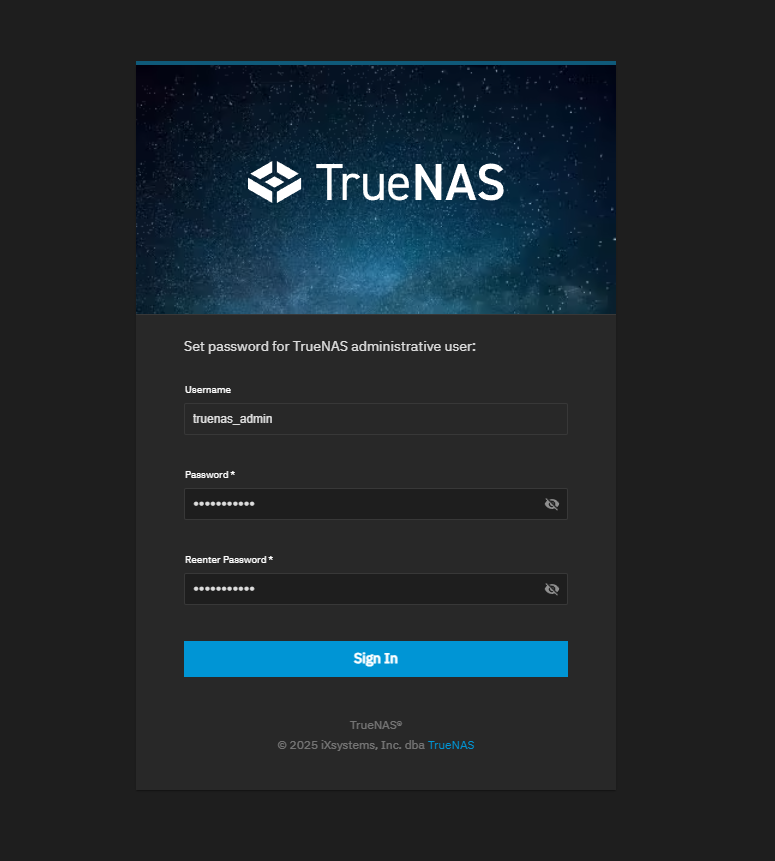
After navigating to TrueNAS’s web UI, you will be greeted with a page instructing you to set a password for the truenas_admin user account, so go ahead and set this password (don’t forget it!) and then click “Sign In”.
General Settings
In the sidebar on the left, navigate to System > General Settings.
In the Localization widget on this page, click the Settings button and change the below to your preferences:
- Language
- Keyboard layout
- Timezone
- Date format
- Time format
Network Settings
In the sidebar, navigate to System > Network.
In the Interfaces widget on this page, click the ⋮ button and then click Edit.
Currently, the TrueNAS VM’s IP address is dynamic, meaning your router/DHCP will reassign it different IP addresses over time. This can cause access issues if it changes without you realizing it until you try accessing the files in your storage pool and find it is no longer accessible at its previous IP address, so let’s change TrueNAS to use a static IP address instead so it will never change.
Select Define Static IP Address, then click the Add button next to Static IP Addresses. In the box that appears, enter a new static IP address for TrueNAS to use.
NOTE: Like we did before with setting a static IP address for Proxmox, you will want to ensure the IP address you want to change this to is actually available so you avoid a conflict. You can open a terminal on any computer and run
ping <IP address>to verify this before setting a new IP address for TrueNAS.
Home networks commonly use a
255.255.255.0subnet mask (or/24in CIDR notation). You can verify this by confirming all of the IP addresses for all of the devices on your home network have the same first 3 octets (10.0.0.Xor192.168.0.X), so be sure to set this subnet value appropriately in the dropdown menu to the right of the IP address.
If the dynamic address that was automatically assigned to TrueNAS by your router is
10.0.0.143, then you should set a new IP address that has the same first three octets10.0.0, such as10.0.0.30. If the address that was automatically assigned to TrueNAS is192.168.0.137, then you should set the new IP address to something like192.168.0.30, etc. Just be sure to first verify that the address you want to change it to is not already in use.
After saving your changes, you will likely be prompted to re-register your gateway IP address and your DNS IP address. These should be pre-populated for you already, so just confirm to proceed.
After confirming, you will see a message stating there are unapplied network interface changes that need to be tested before saving them. Click the Test Changes button, check the Confirm box in the dialog window that appears, then click Test Changes again.
In your address bar of your browser, navigate to the new IP address that you changed to, log back in, and you’ll see a pop-up window asking you to save your changes by clicking the Go To Network Settings button. Click this, then click the Save Changes button to complete the static IP setup.
Adding a User
You already have the truenas_admin user account set up for accessing TrueNAS’s web UI, but we need to create a separate user that we will use to access our storage from other machines.
In the sidebar, navigate to Credentials > Users. Click the Add button in the top-right corner, set a username and a password, then click the Save button.
Create a Storage Pool
In the sidebar, navigate to Storage, then click on Create Pool.
Give your pool a name. This can be any combination of alphanumeric characters, hyphens and/or underscores, but no spaces. Sticking to lowercase is best practice. Once entered, click Next.
Next, we have to choose a layout for our storage array. ZFS layouts themselves are a deep rabbit hole that you can dive into on your own if you want, but for the sake of simplicity, here is a rule of thumb based on how many HDDs you have:
-
2 HDDs → Mirror (2-wide, 1 VDEV)
- 50% usable capacity, 1 disk can fail without losing data
-
3 HDDs → RAIDZ1 (3-wide, 1 VDEV)
- 66% usable capacity, 1 disk can fail without losing data
-
4 HDDs → Mirror (2-wide, 2 VDEVs)
- 50% usable capacity, 1 disk in each mirror can fail without losing data
-
5 HDDs → RAIDZ2 (5-wide, 1 VDEV)
- 60% usable capacity, any 2 disks can fail without losing data
-
6 HDDs → RAIDZ2 (6-wide, 1 VDEV)
- 66% usable capacity, any 2 disks can fail without losing data
-
Alternative for 6 HDDs → Mirror (2-wide, 3 VDEVs)
- 50% usable capacity, 1 disk in each mirror can fail
- Better performance than RAIDZ2 but sacrifices usable capacity
For more information on ZFS layouts, the video below is a good starting point:
Once you have chosen the layout for your pool, click Save and Go to Review, verify everything looks good, then click Create Pool.
You will get a warning message stating that all added disks will be erased in the process of creating the pool. If you approve, check the Confirm box, then click Continue.
Create a Dataset and Share
Now that we have a pool set up, we need to create a dataset on it.
“What’s the difference between a pool and a dataset?”
If a pool is a filing cabinet (the overall “container” of raw storage that is made of disks), the datasets are the drawers in the filing cabinet where you actually store your files.
You can choose to have multiple datasets, where each dataset can be used for different purposes and storing/sharing different types of files, but you must have at least one.
For the simplicity of this guide, we will just create a single dataset. Datasets themselves do not use or reserve any space in the pool, only the files within them do, so you can easily add more datasets later if you feel the need to, and later move files from one dataset to another if desired.
To create a dataset, in the sidebar, click on Datasets, select your pool, then click the Add Dataset button in the top-right corner.
Give your dataset a name. This can be any combination of alphanumeric characters, hyphens and/or underscores, but no spaces. Sticking to lowercase is best practice.
Under Dataset Preset, I recommend choosing “Multiprotocol” - this will share the dataset over the network via both SMB (for accessing from your Windows/macOS computer) and NFS (for accessing from Linux, which will come in handy when we create our Debian VM later).
Once selected, click Save. You will be prompted to enable and start the NFS and SMB services, go ahead and click Start on both prompts.
Set Permissions
Now that we have a dataset created on our pool, we need the non-admin user we created earlier to have access to it.
On the Datasets page, click on your dataset underneat your pool to select the dataset, then in the Permissions widget, click the Edit button.
In the User dropdown menu, select the user you created earlier, then check the Apply User checkbox. In the Group checkbox, select the group name matching the user you created earlier, then check the Apply Group checkbox.
Next, ensure all Read/Write/Execute checkboxes on the right are checked, then click Save.
That takes care of the permissions for the dataset itself and its SMB share, but we also need to set the permissions for the dataset’s NFS share, since NFS handles permissions differently from SMB.
On the sidebar, navigate to Shares, and in the NFS Shares widget, click the ⋮ button next to your dataset’s NFS share, then click Edit.
In the window that appears, click Advanced Options. In the Mapall User dropdown menu, select the user you created earlier, then under Mapall Group, select the group matching the user you created earlier.
You can optionally enter specific IP addresses of client machines under Hosts to restrict access to only those IPs if desired.
Click Save to apply the changes.
Test it Out
Let’s test out connecting to your storage share from your computer.
If you’re using Windows:
- Open File Explorer and enter
\\<your-truenas-ip>in the address bar, replacing<your-truenas-ip>with the static IP address you set for TrueNAS earlier. You should see your dataset show up as a shared folder. Double-click it, enter the username and password of the user you created earlier when prompted, and you should now have access to your storage from your Windows PC!
If you’re using macOS:
- Open Finder and press
Cmd+Kto open the “Connect to Server” window. Entersmb://<your-truenas-ip>in the “Server Address” field, replacing<your-truenas-ip>with the static IP address you set for TrueNAS earlier. Click “Connect”, enter the username and password of the user you created earlier when prompted, and you should now have access to your storage from your Mac!
Scrubbing
With ZFS, it’s important to periodically run a scrub task to ensure data integrity and detect any potential issues with the disks in your pool.
By default, TrueNAS automatically sets up a recurring task to scrub your pool after creating it, so there is nothing additional you need to do here, but it’s good to be aware of this feature. You can view and manage scrub tasks by navigating to Storage to view the Storage Health widget.
Snapshots
Snapshots are a powerful feature of ZFS that allow you to take point-in-time copies of your datasets. This is useful for data protection, as you can easily roll back your entire dataset to a previous state, or just navigate into a snapshot to quickly retrieve an accidentally deleted or modified file.
In the sidebar, navigate to Data Protection > Periodic Snapshot Tasks, then click on Add to create a new snapshot task.
In the Dataset dropdown menu, select your dataset. Configure the schedule and retention settings according to your preferences, then click Save.
Below are some recommended settings:
- Hourly: 2 days
- Daily: 2 weeks
- Weekly: 2 months
Backing Up Your Configuration
It’s a good idea to back up your TrueNAS configuration settings so that you can easily restore them in case of a system failure or if you need to reinstall TrueNAS.
In the sidebar, navigate to System > Advanced Settings, then in the top-right corner, click Manage Configuration > Download File > Save to download a backup of your current TrueNAS configuration to your computer.
Keep this file in a separate safe place, NOT on your TrueNAS storage! If you ever need to restore your configuration on this installation or a new fresh installation, you can do so by clicking Manage Configuration > Upload File on this same page and selecting the backup file you downloaded.
Next Steps
Now that TrueNAS is installed and configured, you can proceed to the next step in the blueprint: Setting up another VM for Installing Home Assistant OS.